Large Doors, Gates & Drawbridges
Our game allows you to build large doors, gates and bridges that "open" and "close" (or appear/disappear) at the click of a sign.
Contents
Castle Style Gates
See the main Gate article for how to build a gate.
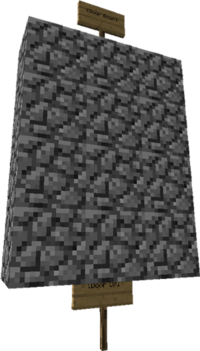
Giant Doors
Doors are configurable-width flat vertical sections of the world that you can toggle on and off. They are similar to [[../Bridges/]], but bridges are horizontal.
- Doors can be toggled by right clicking a sign, or;
- Doors can be set with redstone input.
As doors they are not very fancy, but you can re-purpose them for a number of other uses. If you want to toggle an actual fancy door, check out [[../toggle areas/]].
Construction
Doors consist of three parts:
- The door part made out of one material. By default, you can use stone, dirt, cobblestone, wood, log, glass, wool, double stone slabs, stone slabs, brick, bookshelves, snow blocks, or clay blocks, but this list can be configured.
- One sign post at the bottom in the middle. The second line of the sign must be [Door Up].
- A sign post at the top in the middle. The second line of the sign must be [Door Down].
- If the player is allowed to, they can put infinite on the first line of the signs to not run out of blocks. (If stop-mechanism-dupe is active.)
- The 3rd and 4th lines of the sign symbolize width. The 3rd line is how wide it is on the left, whilst the 4th is how wide it is on the right.
If stop-mechanism-dupe is turned on in the configuration, you must create the entire door or it will not work. You can restock mechanics by right clicking with the required block.
If you want one side to be un-right clickable, use [Door] as the second line
Redstone support
Doors support redstone: just put a redstone current next to the sign.
- An active input creates the door.
- An inactive input removes the door.
Uses
Aside from the obvious use as a retractable door, some possibilities include:
- Use as a hidden bookshelf entrance.
- A toggle for flooding the area directly below with either water or lava, which could be useful for either PvE or PvP.
- A trap to temporarily contain hostile mobs, only to release them at a later time in a PvP situation.
- A basic logic test for newcomers to a server.
- A door that one person must keep open by remaining on a pressure pad or pressing a stone button from a distance while another passes through.
- Combine with redstone and bridges to create a drawbridge (great for castles)
- Some other clever use that will blow all of our minds.
Drawbridges
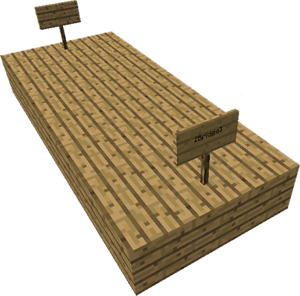
Bridges are configurable-width flat sections of the world that you can toggle on and off. The width of the bridge can be changed.
- They can be toggled by right clicking a sign, or;
- They can be set with redstone input.
As bridges they are not very fancy, but you can re-purpose them for a number of other uses. If you want "vertical bridges," look into using [[../Doors/]]. If you want to toggle an actual fancy bridge, check out [[../toggle areas/]].
Construction
Bridges consist of three parts:
- The bridge part made out of one material. By default, you can use cobblestone, wood, glass, double stone slab, but this list can be configured.
- One sign post on one end, either above or below the bridge. Alternatively, a wall sign can be placed on the side of the block that the sign post would be placed above/below. The second line of the sign must be [Bridge].
- A sign post on the other end, either above or below. Alternatively, a wall sign can be placed on the side of the block that the sign post would be placed above/below. The second line of the sign must be [Bridge] or [Bridge End] (you are only able to right click the first type).
- If the player is allowed to, they can put infinite on the first line of the signs to not run out of blocks. (If the configuration is set to require blocks)
- The 3rd and 4th lines of the sign symbolize width. The 3rd line is how wide it is on the left, whilst the 4th is how wide it is on the right. For example, the 3rd line being 0 and the 4th line being 1, will be a 2 wide bridge with the second row being on the right side. The default width is 1 on both lines (Making it have a default width of 3 overall)
The signs can be both either above or below the bridge (Or on the side of the block), but they must be in the center, and the backs of the signs must be facing each other. If the configuration is set to require blocks, you must create the entire bridge or it will not work. You can restock mechanics by right clicking the sign with the required block.
Redstone support
Bridges support redstone: just put a redstone current next to the sign. You may want to place signs under bridges so that they are not unsightly if you do use redstone.
- An active input creates the bridge.
- An inactive input removes the bridge.
Uses
Aside from the obvious use as a retractable bridge, some possibilities include:
- Using them as flood gates to block water or lava.
- Using them as flood gates to unleash water or lava on unsuspecting players.
- Luring enemies into a pit with a bridge floor, then releasing the enemies when an unsuspecting player is nearby.
- Function as a trap door to catch unsuspecting players.
- Toggle a part of a house's floorboards to hide things underneath.
- Switch a sky light on and off.
- Suffocating unsuspecting intruders or hostile mobs.
- Some other clever use that will blow all of our minds

